No, we currently have licenses that allow for up to 300 students.
To enable polling in Zoom,
- Go to berkeley.zoom.us to log in.
- In the left navigation panel, click the Settings link.
- Scroll down to the In Meeting Basic section. You’ll see that Polling is deselected.
- Click the toggle button to activate the polling option.
See Polling for Meetings for details on setting up polling for your meetings and creating new polls.
Refer to the following instructions:
You can create up to 50 breakout groups per session. The limit for participants per Zoom meeting is 300 so you can distribute them all across 50 breakout groups.
For more information, see Getting Started with Breakout Groups
You can have up to 20 whiteboards per session and toggle between them.
For more information, see Sharing a Whiteboard
First thing you will need to do is enable breakout rooms and enable the ability to pre-assign attendees to breakout rooms when scheduling a meeting. To do this:
- Log in to your Zoom account.
- Click the Settings link on the left .
- Click the In Meetings (Advanced) link and then make sure that breakout rooms are enabled and the Allow host to assign participants to breakout rooms when scheduling option is enabled.
Once you’ve enabled these options in your Zoom account you can pre-assign your students to breakout rooms.
All Cal students have a Zoom account associated with their CalNet ID, so you do not need to schedule your meeting with the authenticate or registration required options. This Zoom guide, Pre-assigning participants into breakout groups, shows how you can pre-assign your students to breakout rooms manually within the Zoom web portal, or via CSV upload in the Zoom web portal.
As long as you use your CalNet account to login to Zoom, you will simply be able to search for your student’s names or email addresses and select them from a list to assign them to a breakout room:
After you’ve created your breakout rooms and scheduled your meeting, simply start your Zoom meeting and click Breakout Rooms button in the meeting controls, and then click the Open All Rooms button to place your students in their breakout rooms (See Managing Video Breakout Rooms for further details.)
NOTE: As long as your student’s login to Zoom with their CalNet accounts they’ll be placed in the breakout room you pre-assigned them. If a student does not log in with their CalNet ID or calls into the meeting via phone you may have to manually place them in their breakout group during the Zoom session.
Switching between Randomized Breakout Groups and Pre-assigned Breakout Groups
If you’ve randomized breakout room groups in your meeting, and want to go back to your pre-assigned breakout groups:
- Close all active breakout rooms (if they are currently open)
- Click the Breakout Room button
- Click the ‘Recreate’ button, and then select the ‘Recover to pre-assigned rooms’ option
This will re-organize your breakout rooms from random to your pre-assigned groupings.
IMPORTANT
If you are going to pre-assign students, right before you break your students out into their room, click the Recover to pre-assigned rooms option. This will ensure that students will be in their intended groups.
For students, the best way to access Zoom is through the downloaded application.
IMPORTANT: Students will not be able to access Zoom’s full features (such as Break Out Rooms) through Chrome. To ensure access to all the features, students should download the Zoom app.
Students can download the application from here: https://zoom.us/support/download
The Q&A feature is available only for Zoom webinars not Zoom meetings.
Zoom Meetings are intended specifically for presenter and participant interaction, whereas Zoom Webinars are view only. When you facilitate a discussion session in a Zoom Meeting, you can pose a question and have students use the Raise Hand tool to participate. The Raise Hand tool will alert you that a student has a response.
For more information on the Raise Hand feature see the article, Raise Hand in Webinar.
For key differences between a Zoom Meeting and a Webinar, see the article, Meeting and Webinar comparison.
- Set your Zoom session to record in the cloud.

- Your recordings will be available in Zoom cloud and copied to My Folder on Panopto when they are finished processing.
- Navigate to the Media Library (Panopto) section of bCourses site you want to share your Zoom recordings with.
- (If you do not see a Media Library (Panopto) link in your left navigation bar, follow the steps in this guide to enable it.)
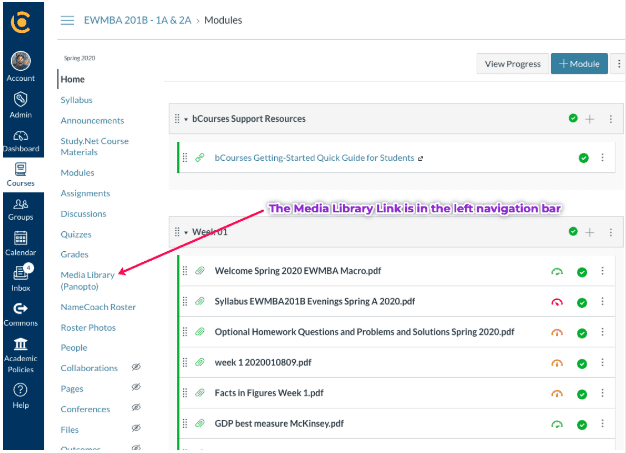
- (If you do not see a Media Library (Panopto) link in your left navigation bar, follow the steps in this guide to enable it.)
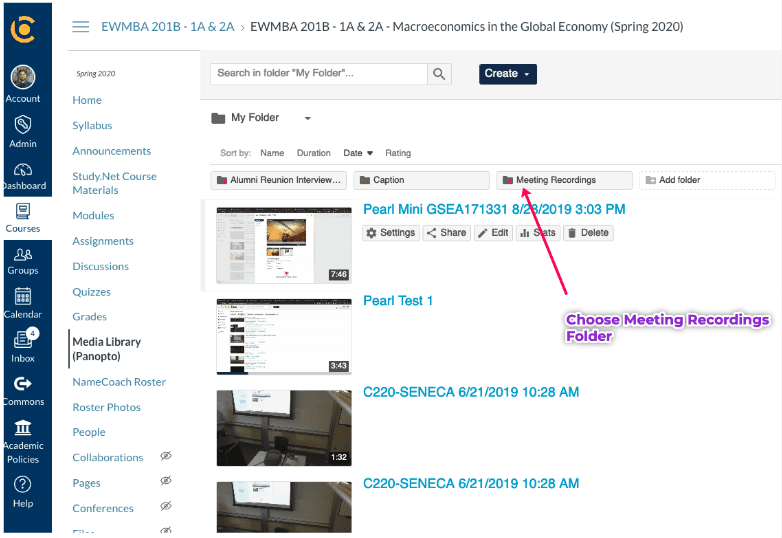
- Take note of the title of the Panopto folder, as indicated in the picture below.
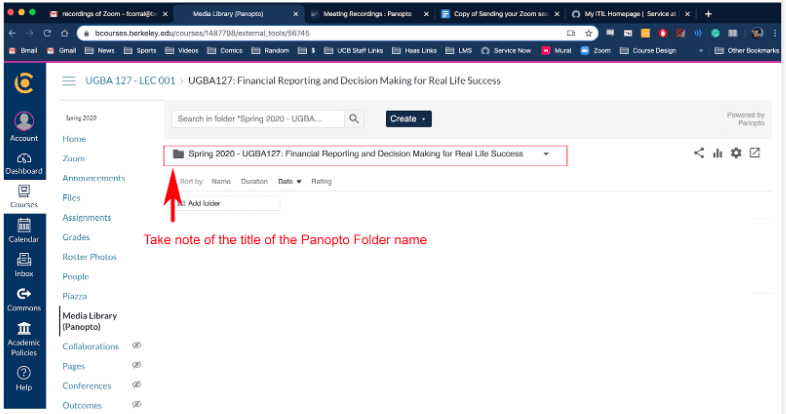
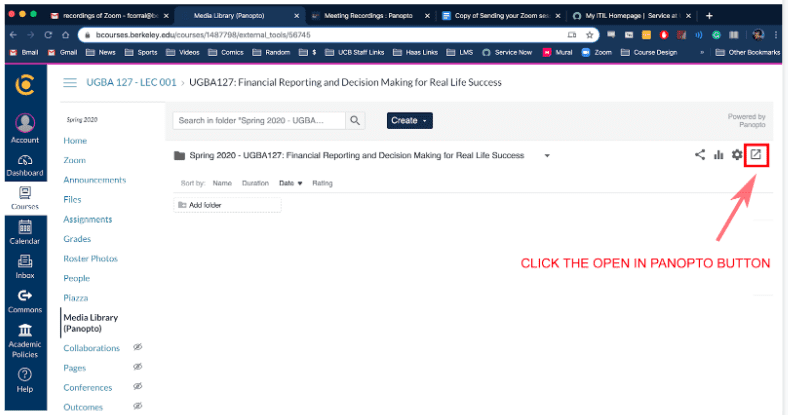
- Click the Open in Panopto button in the upper righthand corner.
- Click the My Folder link from the navigation bar on the left.
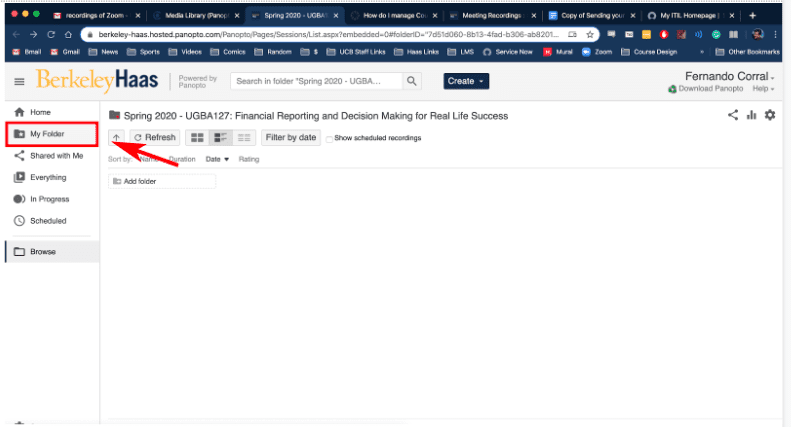
- There will be a folder called Meeting Recordings. Click to open that folder.
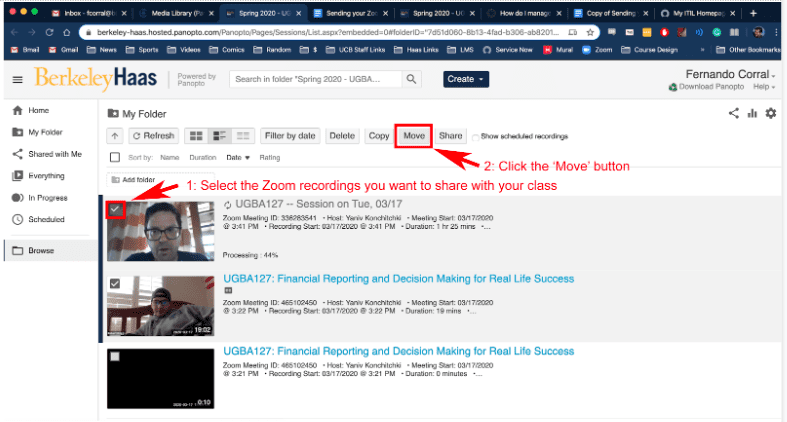
- From within your My Folder you will see all of your Zoom recordings. Select all of the recording you’d like to share with your class, and then click the Move button
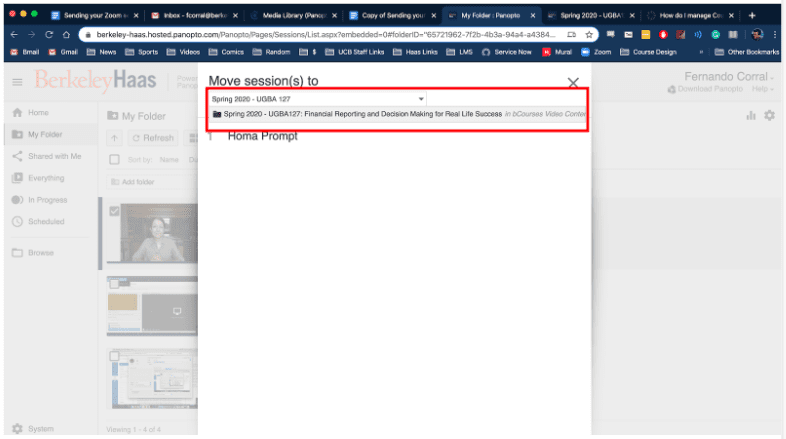
- The move dialog box will open. Begin by typing the title of the Panopto folder you took note of earlier, for the course you wish to share your videos to. As you type, a drop-down will list available courses for you to choose. Select the correct folder.
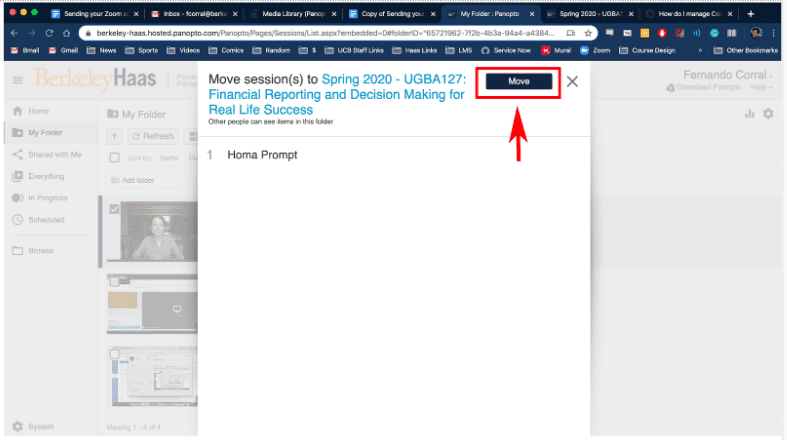
- Once the correct folder is selected simply click the Move button.
- Your videos will now be available for your students to view. You can instruct your students to view the recordings by telling them to click the Media Library (Panopto) link in their bCourse site.
Notes for Staff
- All members of the Panopto Group “Teaching Spring 2020” have this feature enabled.
- If a user reports not seeing the “Meetings Recordings” folder, add the user to this group on Panopto first before further troubleshooting.
- When a meeting is imported into Panopto, the host email address is referenced. If the meeting host has a Panopto account with a matching email, the Zoom recording will be placed into their My Folder. If the meeting host does not have a Panopto account, the Zoom recording will be placed in a subfolder of the selected default folder named with the user’s email address. If the Zoom user does have a Panopto account created in the future, the folder of videos will be moved into their My Folder.
- This may be an issue when the @haas & @berkeley emails conflict between services. This is a known issue, currently without resolution
We are no longer recommending or supporting the Zoom-bCourses Integration.
This integration merely allowed for a scheduling window to be available for faculty from inside bCourses and does not affect the ability to host, share, attend, participate or record meetings. All functionality that would have been provided by the integration can accessed via berkeley.zoom.us.
Any existing requests or new tickets regarding this integration will be closed and clients will be given this notice. We will continue to monitor the integration with Zoom and bCourses, and if the integration becomes more stable & supportable, we will let faculty know.
How to ensure that you have all the pro account features
- Log out of your bMail/CalNet account in your browser.
- Log out of your account in the Zoom App on your computer.
- Go to berkeley.zoom.us and login with CalNet again.
- This should update your account.
- Go to your profile and look for “Licensed” under “User Type” if you still see “Basic” send an email to [email protected].
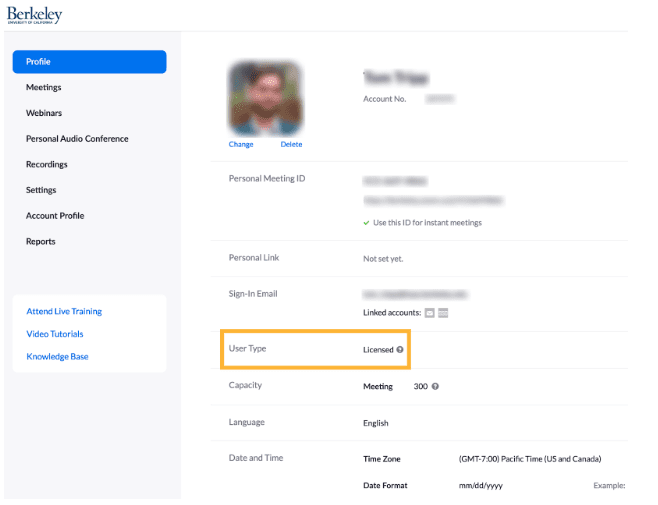
- If you see “Licensed,” log in again on the Zoom App, and you should be all set.
Introduction
Zoom is a powerful online service offered by UCB and supported by Haas TS, Berkeley Telecom and Zoom.us. When using Berkeley Zoom Services, please exercise the same care you would when hosting a comparable in-person gathering.
For more information on using Zoom Pro at Berkeley Haas, please go to https://haas.berkeley.edu/technology-solutions/how-do-i/media-services/
and click on Zoom.
Proper Login
Always be mindful of how you log in. For best results, log in at the Berkeley Zoom web portal https://berkeley.zoom.us/signin to start sessions for which you are the host. DO NOT start your sessions by clicking on the link in the invitation, that is intended for Participants only. If you enter your meeting via that method – even if you’re already signed in on the meeting app, even if you are logged into bConnected, even if you have the option set to Enable Join Before Host – you risk not having any Host controls over your own meeting, at a minimum.
When using an SPA (group) account, be EXTRA mindful of how you log in. First and foremost, open an Incognito window in Chrome to avoid logging into the wrong account. Read Google’s instructions on Incognito windows here: https://support.google.com/chrome/answer/95464?co=GENIE.Platform%3DDesktop&hl=en
Read Berkeley’s very useful and important instructions for proper SPA login here: https://calnetweb.berkeley.edu/calnet-departments/special-purpose-accounts-spa/log-spa
After you log in, on the Profile tab verify that the User Type is “Pro.” If it says “Basic” this means there may be a login issue with your account or you missed a step above, and you risk not having any Host controls over your own meeting, and a time limit of 40 minutes on your meeting. If your User Type says Basic and you believe it should be Pro, contact TS at [email protected] right away.
Avoid using the Zoom Scheduler Chrome Extension and/or Gmail Add-On for Zoom. Because of the way Berkeley Zoom authenticates, email sub-domains, etc. we’ve found these tools to have inconsistent results, potentially resulting in improper sign in to your account, 40-minute meeting limits, no Host controls over your own meeting, even inability to access your own scheduled meeting.
Meeting vs Webinar
“Webinar” has become an overly ubiquitous term and is often used incorrectly. In this context, it is a specific type of online session with generally a one-directional information flow, from the Host/Panelists to the Participants. For example, only the Host and designated Panelists have rights to share resources such as microphone, camera, screen or whiteboard. Attendee participation, on the other hand, is limited to features such as Q&A, Chat, Polls, Hand-Raise and Feedback, if enabled in your meeting settings.
In contrast, a Zoom “Meeting” by design is a more collaborative space. Participants attending can share the microphone, camera, and screen, and optionally can annotate on someone else’s screen share, etc.
Both meetings and webinars have their own beneficial features, but they are separate tools. Consider your desired goals and end-user experience when choosing the right tool for the job.
Note that Zoom Webinar is an additional upgrade to the standard Zoom Pro service, and generally appropriate only for promotional or informational online events. Consider your intended audience, if it includes unknown members of the public consider using a Webinar, or follow the further steps below to secure your meeting.
If unsure which tool is best for your next online session, contact TS [email protected].
Other steps and settings to secure control of your Zoom Meeting
- Don’t use your Personal Meeting ID for scheduled meetings. See more info here: https://support.zoom.us/hc/en-us/articles/203276937-Using-Personal-Meeting-ID-PMI-
- Know who is attending your sessions, use the Registration options (especially when inviting the public). See more info here: https://support.zoom.us/hc/en-us/articles/211579443-Registration-for-Meetings
- Review your settings
- My Meeting Settings: Made by logging into the web portal. Changes made will not be reflected if a meeting is in progress, but only once a meeting starts after changes are made. See below for our recommended settings for more secure meetings:
- In Meeting (Basic)
- End to End Encryption: On
- Auto Saving Chats: On
- File Transfer: Off
- Co-host: On; allows a colleague to help manage the session
- Allow host to put attendee on hold: On
- Always show meeting control toolbar: On
- Annotation: Off; so attendees cannot write on your screen share
- Whiteboard: Off; so attendees cannot share a whiteboard
- Remote control: Off
- Learn more about settings: https://support.zoom.us/hc/en-us/articles/115005756143-My-Meeting-Settings
- In Meeting (Basic)
- Desktop App Settings: Made inside the Zoom app.
- My Meeting Settings: Made by logging into the web portal. Changes made will not be reflected if a meeting is in progress, but only once a meeting starts after changes are made. See below for our recommended settings for more secure meetings:
- Manage Participants during a session
- Basic muting: In the Participants panel, next to a Participant’s name, you can turn off their microphone and camera. Keep in mind however the Participant can still turn those features back on again.
- Mouse over the Participant’s name in Participant list
- Click Mute to temporarily turn off their mic
- Click More to see other participant control options:
- Stop Video, to turn off their video
- Put On Hold, to block them from the meeting until you manually Take Off Hold
- Remove, to take them out of the meeting, after which they cannot rejoin
- At the bottom of Participants panel, click the More drop-down
- You can choose to automatically Mute Participants upon entry
- They can unmute themselves with this option unless you…
- Uncheck the option to Allow participants to unmute themselves
- You may also Lock the meeting, to prevent anyone else from entering
- You can choose to automatically Mute Participants upon entry
- Basic muting: In the Participants panel, next to a Participant’s name, you can turn off their microphone and camera. Keep in mind however the Participant can still turn those features back on again.
- Manage Content Sharing during a session
- On the Meeting Toolbar, click the up arrow to the right of the Share button
- Choose either One Participant Can Share At A Time (recommended), or Multiple Participants Can Share Simultaneously
- Click Advanced Sharing Options: Who Can Share?
- Select Only Host if you do not want anyone else to share content during the meeting
- Take the training
- Free, live Zoom training from the experts, weekly: https://support.zoom.us/hc/en-us/sections/201740096-Training
- Contact Haas TS with any questions or concerns at [email protected]
Please visit berkeley.zoom.us and on the left-side navigation, click Profile. Verify that User Type lists “Licensed” 300 (and not Basic). If you do not see “Licensed” please email [email protected] and let us know.
You’ll need to login using your Calnet ID at berkeley.zoom.us The automated email sent by Zoom has in some cases not included this information. If you have any difficulties logging in after receiving your email and visiting the site, please contact us at [email protected].
